I’ve read many different guides on this but none seemed to provide end-to-end guidance or were cluttered with other noise unrelated to Lambda or Connect.
The power of Lambda function inclusion in the contact flow is immense – perform security functions, lookup/validate/store data, lookup customer data for CRM integration, etc. While learning this, I created a simple Lambda function to simply multiply the caller’s input by 10, store both numbers, and return the output to the caller – I’ll dive into querying Dynamo databases in the near future.
What we’re doing
Using Amazon Connect and AWS Lambda, we’ll create a phone number which accepts a user’s DTMF input, multiplies it by 10, saves the results as contact attributes, and regurgitates those numbers to the caller. The final experience can be had by calling +1 571-327-3066 (select option 2).
Step 1-Create your Lambda Function
Visit the Lambda console and select “Create Function”. For this example, I’m going to use the following details:
Name: “FKLambdaDataDip”
Runtime: Node.js 8.10
Rule: Create a custom role (and use the default values on the subsequent popup)
Step 2-Creating the Resource Policy
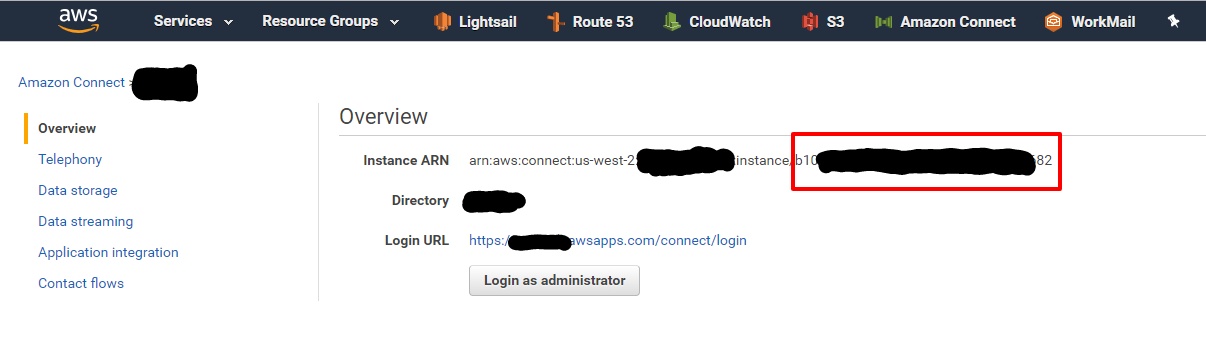
Now that the Lambda function exists, copy the ARN from the top right of the page:

Using the AWS CLI, we’ll create a resource policy for the function & Connect:
aws lambda add-permission --function-name function:<YOUR_LAMBDA_FUNCTION_NAME> --statement-id 1 --principal connect.amazonaws.com --action lambda:InvokeFunction --source-account <YOUR_AWS_ACCOUNT_NUMBER> --source-arn <YOUR_AWS_CONNECT_INSTANCE_ARN>
You can find your Connect ARN in the admin console and your AWS acount ID on your AWS account page.
Step 3-Granting Connect permission to invoke your Lambda function
From the Connect admin page, select “Contact Flows” from the left menu. Under the AWS Lambda heading, select your function from the drop down and click ‘+Add Lambda Function”.

You should now be able to successfully invoke your Lambda function via your Amazon Connect contact flow.
Step 4-Creating the Amazon Connect Contact Flow
I’m going to outline my high-level flow before finishing my actual Lambda function. We’ll come back and plug in all the variable names and details. Here’s the visual of my flow:

Step 5-Finalizing the AWS Lambda Function
As noted, our function will simply multiple the number entered by 10 and return it.
exports.handler = function(event, context, callback) {

var receivedCallerSubmittedNumber = event['Details']['Parameters']['callerSubmittedNumber'];
var calculated = receivedCallerSubmittedNumber * 10;

var resultMap = {
    sentLambdaCalculatedNumber:calculated
}

callback(null, resultMap);
}
Note that we’re getting to the “callerSubmittedNumber” variable via “event[‘Details’][‘Parameters’][‘callerSubmittedNumber’]”. This is because the json published from Connect to Lambda has this structure (where our Connect attributes are passed in the parameters section):
{
    "Details": {
        "ContactData": {
            "Attributes": {},
            "Channel": "VOICE",
            "ContactId": "4a573372-1f28-4e26-b97b-XXXXXXXXXXX",
            "CustomerEndpoint": {
                "Address": "+1234567890",
                "Type": "TELEPHONE_NUMBER"
            },
            "InitialContactId": "4a573372-1f28-4e26-b97b-XXXXXXXXXXX",
            "InitiationMethod": "INBOUND | OUTBOUND | TRANSFER | CALLBACK",
            "InstanceARN": "arn:aws:connect:aws-region:1234567890:instance/c8c0e68d-2200-4265-82c0-XXXXXXXXXX",
            "PreviousContactId": "4a573372-1f28-4e26-b97b-XXXXXXXXXX",
            "Queue": "QueueName",
            "SystemEndpoint": {
                "Address": "+1234567890",
                "Type": "TELEPHONE_NUMBER"
            }
        },
        "Parameters": {
            "sentAttributeKey": "sentAttributeValue"
        }
    },
    "Name": "ContactFlowEvent"
}
6-Finalizing the Amazon Connect Contact Flow
Back in the Contact Flow Designer, we’ll edit the “Invoke AWS Lambda Function” module to plug in our Function ARN (again, copied from the Lambda function’s page). This is the same function ARN that you setup the policy for in step 2.
In the next “Set contact attributes” module, we’ll set the attribute “Destination Key” to “lambdaCalculatedNumber”, the type to “External”, and the “Attribute” to “sentLambdaCalculatedNumber”.
Lastly, we’ll edit the last prompt of the flow to play back the number by configuring it to “Text to speech”, “Enter Dynamically”, “External” as the type, and “sentLambdaCalculatedNumber” as the Attribute.
Save and publish your contact flow.
As the variable and key assignments can be a bit confusing and as the documentation provided by Connect on this is of poor quality, I’ve recorded what I’ve set each of my to in this demo. Connect’s own documentation actually has some typos in it that will result in errors from Lambda (at the time of writing this, at least).
Step 7-Testing
Once you associate your contact flow with a number, you can now test. Beyond dialing and hearing the response, we can see it recorded alongside the contact attributes:

I’ve setup a test number for this demo: +1 571-327-3066 (select option 2). Dial to experience the end result.