I wanted to try my hand at using OpenAI’s DALL·E API to generate an image and then mint that image as an NFT as a learning experience. The DALL E model API is still in beta which becomes obvious pretty quickly after playing with it for a few minutes. I look forward to seeing this progress over the next couple of years. Imagine merging OpenAI’s ChatGPT with DALL E for AI-generated prompts generating AI-generated images and (maybe one day) video. It’s both scary and exciting at the same time.
The whole process was surprisingly simple. I created my OpenAI account and bought $20 worth of credits to play with. I was worried about how expensive each image was but found $20 difficult to spend. I ran through ~30 different prompts to generate over 300 images and only spent $7. I recommend generating at least 5-10 images per prompt to get a sense of the variety the AI has to offer before defaulting to adjusting your prompt.
Once installed, grab your API key from your OpenAI account and the rest is straightforward:
<?php
require '/vendor/autoload.php';
use Orhanerday\OpenAi\OpenAi;

$open_ai = new OpenAi('<api_key>');

$complete = $open_ai->image([
  "prompt" => "3d render of a cat astronaut floating in space with rainbow lasers shooting from behind.", //Your prompt can be up to 1000 characters long
  "n" => 10, //The count of results you want to produce
  "size" => "1024x1024", //The size of the images you want to produce. 256x256, 512x512, or 1024x1024 are the only options avail.
  "response_format" => "url", //Retrun the image URL or base64 ecoding of the image (as value b64_json)
]);

$response = json_decode($complete, true);

foreach($response['data'] as $image) {
  echo "<img src=\"".$image['url']."\"/><br />";
}
?>
While your prompt can be up to 1000 characters long, I found the AI got very confused after a few hundred characters and the output became nearly impossible to tweak unless you just wanted randomness. As mentioned above, I found it best to output at least 10 results for each prompt when tweaking. Anything less doesn’t give you a full sense of what the AI is going to generate with your output so you’re under-informed when making tweaks to your prompt. Lastly, the size doesn’t really matter as a 256×256 run costs the same as 1024×1024.
One output from the above sample prompt:
Minting the image as an NFT with OpenSea
I opted for the Polygon chain to avoid excessive gas fees on something this trivial. I connected my wallet app to OpenSea and created a new collection. With a few clicks, I had “minted” Space Cat!
After tinkering with automating crypto buys with the Coinbase API, I wanted to bring in my NFTs as part of my aggregate crypto portfolio (even though my NFTs are more personal interest than investment). I opted to explore Moralis as I’d never worked with their platform before and it seemed to have a good community around it. Overall, I’m pleased with the result but a few things of note.
First, the API is slow (but it is free). A call for a wallet’s NFTs across ETH and Polygon chains with corresponding URI fetches takes about 20 seconds for my ~50 NFTs.
Second, the Moralis cache of NFT data doesn’t always refresh against their stated SLA and I found a couple of my NFTs simply refuse to refresh. The Moralis documentation and community forum suggest they’re working on improving this but it’s quite frequent that users have to escalate to support when API calls for metadata refresh simply don’t work. I’m unsure if this is a Moralis problem or not but it feels like it is as platforms like OpenSea have no problem updating their NFT cache.
require_once('/home/vendor/autoload.php');

//Using Guzzle over cURL
$client = new \GuzzleHttp\Client();

//I want to check both ETH and polygon chains
$nft_networks =array("eth","polygon");

//Start a loop for each of the chains I want to query.
foreach($nft_networks as $nft_nftwork){
  $response = $client->request('GET', "https://deep-index.moralis.io/api/v2/<your_wallet_address>/nft?chain=$nft_nftwork&format=hex&limit=100", [
    'headers' => [
      'X-API-Key' => '<your_api_key>',
      'accept' => 'application/json',
    ],
  ]);

  $json = $response->getBody();
  $data =  json_decode($response->getBody(),true);

  foreach($data['result'] as $nft) {
    $token_address = $nft['token_address'];
    $token_id = $nft['token_id'];
    $owner_of = $nft['owner_of'];
    $block_number = $nft['block_number'];
    $block_number_minted = $nft['block_number_minted'];
    $token_hash = $nft['token_hash'];
    $amount = $nft['amount'];
    $contract_type = $nft['contract_type'];
    $name = $nft['name'];
    $symbol = $nft['symbol'];
    $token_uri = $nft['token_uri'];
    $metadata = $nft['metadata'];
    $metadata_description = json_decode($nft['metadata'],true);
    $last_token_uri_sync = $nft['last_token_uri_sync'];
    $last_metadata_sync = $nft['last_metadata_sync'];
NFTs are surprisingly non-standard. Metadata lacks standard structure and syntax and URI data can contain images hosted on IPFS, a web2 protocol, or varying forms of video formats. I cleaned this up for the various NFTs I own but I’m sure there’s a better standard to follow.
//Try to get the metadata from the token URI but if that doesn't work, try from the original API call's metadata. The original metadata is usually less reliable and less detailed.
if(!file_get_contents($token_uri)){
  //Set image/video url
  if(isset($metadata_description['image'])){
    $image=$metadata_description['image'];
  } else {
    $image=$metadata_description['image_url'];
  }

  //Set NFT attributes array
  $attributes=$metadata_description['attributes'];

  //Set description
  if(empty($metadata_description['description'])){$description="";} else {$description=$metadata_description['description'];}
} else {
  //Set image/video url
  $token_uri_details = json_decode(file_get_contents($token_uri),true);
  $image=$token_uri_details['image'];

  //Set NFT attributes array
  $attributes=$token_uri_details['attributes'];

  //Set description
  $description=$token_uri_details['description'];

  //Set name
  $name=$token_uri_details['name'];
}

//The metadata and URI can be very non-standard. This is a weak attempt to standardize for easy display but is not a catch-all.
if(mb_substr($image, 0,4)=="http" && empty($metadata_description['animation_url']) && substr($image, -3)<>"mp4"){
  echo "<img alt='logicA' class=\"card-img-top\" src=\"$image\">";
} elseif(mb_substr($image, 0,12)=="ipfs://ipfs/" && empty($metadata_description['animation_url']) && substr($image, -3)<>"mp4"){
  echo "<img alt='logicB' class=\"card-img-top\" src=\"https://ipfs.io/ipfs/".str_replace("ipfs://ipfs/", "",$metadata_description['image'])." \">";
} elseif(mb_substr($image, 0,4)=="ipfs" && empty($metadata_description['animation_url']) && substr($image, -3)<>"mp4"){
  echo "<img alt='logicC' class=\"card-img-top\" src=\"https://ipfs.io/ipfs/".str_replace("ipfs://", "",$metadata_description['image'])." \">";
} elseif(!empty($metadata_description['animation_url'])){
  echo "<video class=\"card-img-top\" autoplay controls loop>
    <source src=\"https://ipfs.io/ipfs/".str_replace("ipfs://", "",$metadata_description['animation_url'])."\" type=\"video/mp4\">
  </video>";
} elseif(empty($metadata_description['animation_url']) && substr($image, -3)=="mp4"){
  echo "<video  class=\"card-img-top\" autoplay controls loop>
    <source src=\"$image\" type=\"video/mp4\">
  </video>";
}
Lastly, we’ll display the meta data, NFT attributes, and transaction details.
As part of a separate effort to automate buying and selling crypto for myself, I splintered off and decided to do a quick, fun project. I created a “Virtual Swear Jar” which is a simple progressive web app on my phone. With a single tap on the app icon, it opens and buys $10 worth of crypto through Coinbase. I have it set to purchase Ethereum but it can easily be swapped for Bitcoin or any of the other coins listed on Coinbase. Like many of my other weekend projects, this one is not day-to-day practical but it helped me explore the Coinbase API for the first time.
The Official PHP SDK for Coinbase has been (understandably) deprecated so I’ve explicitly used CURL for everything.
Step 1: Get Coinbase API service epoch time
The API requires all calls to be within 30 seconds of the API service time. Coinbase makes this somewhat easy with a time endpoint. Rather than attempting to sync my server / adjust time offset, I opted to just call their time endpoint for the current API service time and use that for the remainder of my execution.
Your single account is composed of a unique wallet for each currency and each has a unique account ID. To get these, we have to hit the accounts endpoint with a signed/authenticated request. The signature has to be an HMAC hash using sha256 algorithm. The message must be a concatenation of “timestamp + method + requestPath + body” where body can be null for GET requests like below. POST requests have to be json format.
This will output your account IDs and, for the sake of this tinkering, I’m manually copying mine for step 3.
Step 3: Making the Buy call
$acct=<SHOULD BE REFERENCED FROM AN ENVIRONMENTAL VARIABLE SAFE>;
$api_secret=<SHOULD BE REFERENCED FROM AN ENVIRONMENTAL VARIABLE SAFE>;
$url="https://api.coinbase.com/v2/accounts/$acct/buys";
$method = "POST";
$post = [
    'amount' => 10,//10 = 10 USD
    'currency' => 'USD',
    'commit'   => 'true'//set to false to disable the commitment/completion of transaction for user confirmation.
];
$post=json_encode($post);

$message = strval($cb_time) . $method . "/v2/accounts/$acct/buys" . $post;
$signature = hash_hmac('sha256', $message, $api_secret);

$curl = curl_init();
curl_setopt_array($curl, array(
  CURLOPT_VERBOSE => true,
  CURLOPT_URL => $url,
  CURLOPT_RETURNTRANSFER => true,
  CURLOPT_MAXREDIRS => 1,
  CURLOPT_TIMEOUT => 5,
  CURLOPT_PROTOCOLS => CURLPROTO_HTTPS,
  CURLOPT_CUSTOMREQUEST => "$method",
  CURLOPT_POSTFIELDS => $post,
  CURLOPT_HTTPHEADER => array(
    "Content-Type: application/json",
    "CB-ACCESS-KEY: <SHOULD BE REFERENCED FROM AN ENVIRONMENTAL VARIABLE SAFE>",
    "CB-VERSION: 2016-03-08",
    "CB-ACCESS-SIGN: $signature",
    "CB-ACCESS-TIMESTAMP: $cb_time"
  ),
));

$response = curl_exec($curl);
$err = curl_error($curl);
$response = json_decode($response, true);

if(!empty($err)){
  echo $err;
  die();
}

if(!empty($response['errors'])){
  echo "<pre>";
  print_r($response);
  echo "</pre>";
  die();
}

$amount_purchased=$response['data']['amount']['amount'];//0.000002238
$symbol_purchased=$response['data']['amount']['currency'];//BTC
$transaction_total=$response['data']['total']['amount'];//10.99 ($)
$symbol_price=$response['data']['unit_price']['amount'];//44682.75 ($)
$reference=$response['data']['user_reference'];//12345

echo "$amount_purchased $symbol_purchased purchased for $$transaction_total @ $".number_format($symbol_price);
echo "REF: $reference<br /><pre>";
print_r($response);
echo "</pre>";
And we’re done! You’ll see the transaction confirmation triggers like any other and the currencies should appear in your account as soon as the transaction completes.
Step 4: Adding some flair/styling
As mentioned above, I just used a simple PWA for this project and applied some simple, quick styling to make it look nice. Here’s a demo of the final result:
A few months ago I tried using AWS Rekognition to detect text in images. The results were okay for casual use cases but overall the quality was pretty poor (primarily because Rekognition isn’t intended to be used as an OCR product).
A few days ago (May 29), AWS announced the general availability of Textract, an actual OCR product. Out of curiosity, I wanted to run the same image I ran through Rekognition through Textract to compare the difference. While Textract isn’t 100%, it’s a huge improvement over Rekognition (as should be expected since it’s intended for this).
The “Call Me” concept isn’t new but it’s low-hanging fruit that many don’t take advantage of. Using Amazon Connect, we’ll create a simple UI to improve the caller experience while saving 46% on our telephony costs (assuming we’re making US-destined calls with a US East/West instance) by diverting inbound toll-free calls to outbound DID calls. This is an extension of the “Placing Outbound Calls Using Amazon Connect API” post I did a couple months ago. That post should be your starting point if the code examples below aren’t lining up for you.
The Benefits
The result of a “Call Me” UI is a streamlined caller experience whereby the point of conversion (whether that’s a sale, lead, support request, or other) is merged with a “Call Me” experience that allows you to control the population they speak to and how they get to that population. Beyond the caller experience side (where they benefit from not having to repeat their issue multiple times, not losing their self-service history once they contact, etc), there’s a financial benefit (at least with Amazon Connect). As the Call Me experience is outbound and DID dialing, the costs per minute are ~46% lower than inbound toll-free dialing:
Example based on 10,000 inbound TFN dials per day. This assumes US-bound dialing with US east/west instance types.
Beyond the immediate telephony cost savings and user experience improvement, there’s also the added benefit of transfer reduction and better staff tiering as you know the customer-selected issue before they call (and can route to the correct population/tier based on that issue selection). Additionally, there’s likely a reduction in caller identification, authentication, etc. It’s a win-win that takes very little effort to implement.
What we’re doing
Creating a simple form to allow the customer to enter their phone number and also pass some basic contextual attributes that we’ll present to the agent.
Setup a contact flow to deliver a custom greeting based on contact attributes we pass via the outbound call.
Placing an outbound call to the customer.
Surfacing the contact attributes to the agent via the Streams API (assumes you already have this installed).
To make this look a bit spiffier than just generic forms, I’ll use the Cerulean Bootstrap theme.
We’ll include hidden fields to mimic the following attributes:
Last page the user was on before trying to contact
The authentication status of the user (if they’re authenticated, no need to go through this step on the call)
The VIP status of the user (are they searching for expensive items, a very loyal customer, etc?)
And we’ll surface the following fields to the user to verify accuracy and collect additional information up front:
Starting with a blank contact flow, we’ll set it to:
Detect the value of the “VIP” attribute we set
If VIP=true, we’ll play a special prompt
If VIP<>true, we’ll play a standard, more generic prompt.
Locate the caller’s name (via stored attribute) and pass it to the contact flow to greet the caller by name.
After greeting, terminate the contact.
The full contact flow:
In order to play the caller’s name as part of the prompt, we’ll reference the user-defined attribute we set in step 2 (see referenced code example zip file): “Hello VIP caller $.Attributes.CustomerFirstName“.
Step 3: Placing the Outbound Call to the Caller
Using the snippet from the “Placing Outbound Calls Using Amazon Connect API” post, we’ll simply add in an associative array of key/values which will be available for reference within the contact flow (ie greeting by name based on VIP status) and also stored in the contacts trace record:
//Include AWS SDK
require '/home/bitnami/vendor/autoload.php';

//New Connect client
$client = new Aws\Connect\ConnectClient([
'region'  => 'us-west-2', //the region of your Connect instance
'version' => 'latest',
'credentials' => [
  'key' => '', //IAM user key
  'secret' => '', //IAM user secret
]
]);

//Capture form fields - should do some additonal sanitation and validation here but this will suffice as a proof of concept
$lastPage=$_POST['lastPage'];
$authenticatedStatus=$_POST['authenticatedStatus'];
$vipStatus=$_POST['vipStatus'];
$issueSelected=$_POST['issueSelected'];
$phoneNumber=$_POST['phoneNumber'];
$customerFirstName="Kevin";

//Place the call
$result = $client->startOutboundVoiceContact([
  'Attributes' => array("LastPageViewed"=>"$lastPage",
          "Authenticated"=>"$authenticatedStatus",
          "VIP"=>"$vipStatus",
          "IssueSelected"=>"$issueSelected",
          "CustomerFirstName"=>"$customerFirstName"),
  'ContactFlowId' => '', // REQUIRED
  'DestinationPhoneNumber' => "$phoneNumber", // REQUIRED
  'InstanceId' => '', // REQUIRED
  'QueueId' => '', // Use either QueueId OR SourcePhoneNumber. SourcePhoneNumber must be claimed in your Connect instnace.
  //'SourcePhoneNumber' => '', // Use either QueueId OR SourcePhoneNumber. SourcePhoneNumber must be claimed in your Connect instnace.
]);

echo "<pre>";
print_r($result);
echo "</pre>";
Step 4: Displaying the Connect contact attributes for the agent
For this, we’ll use the Streams API (assuming you already have this setup and in place). Using the same styling from the Caller side demo, we’ll create an agent UI. I’ve plugged in the various API references below so I believe it’s pretty straight forward to follow:
<!DOCTYPE html>
<html lang="en">
  <head>
    <meta charset="utf-8">
    <title>Call Me Demo</title>
    <meta name="viewport" content="width=device-width, initial-scale=1">
    <meta http-equiv="X-UA-Compatible" content="IE=edge" />
    <link rel="stylesheet" href="./style.css">
    <link rel="stylesheet" href="./_variable.css">
    <link rel="stylesheet" href="./_bootswatch.css">
  <script src="https://code.jquery.com/jquery-2.1.4.min.js"></script>
  <style type="text/css">
  .ccp {
    width: 350px;
    height: 465px;
    padding: 0px;
  }

  .ccp iframe {
    border: none;
  }
  </style>
</head>
<body>
    <div class="navbar navbar-expand-lg fixed-top navbar-dark bg-dark">
      <div class="container">
        <a href="../" class="navbar-brand">Call Me Demo</a>
        <button class="navbar-toggler" type="button" data-toggle="collapse" data-target="#navbarResponsive" aria-controls="navbarResponsive" aria-expanded="false" aria-label="Toggle navigation">
          <span class="navbar-toggler-icon"></span>
        </button>
        <div class="collapse navbar-collapse" id="navbarResponsive">


          <ul class="nav navbar-nav ml-auto">
            <li class="nav-item">
              <a class="nav-link" href="#" target="_blank">user</a>
            </li>
          </ul>
        </div>
      </div>
    </div>


    <div class="container">

      <div class="bs-docs-section">
        <div class="row">
          <div class="col-lg-12">
            <div class="page-header">
              <h1 id="forms">Incoming Call</h1>
            </div>
          </div>
        </div>

    <div class="row">
      <div class="col-lg-4">
        <div id="ccpDiv" class="ccp" >
        <!-- your contact control panel will display here -->
        </div>
      </div>

      <div class="col-lg-8">
        <div id="connectAttributesDiv">
        <!-- the contact attributes will display here -->
        </div>
      </div>

    </div>

<script src="../amazon-connect-streams/amazon-connect-v1.2.0-34-ga.js"></script> <!-- replace this with your streams JS file -->
<script>
window.contactControlPanel = window.contactControlPanel || {};

var ccpUrl = "https://<YOUR Connect CCP URL HERE.awsapps.com/connect/ccp#/"; //Plug in your Connect CCP address here

//Contact Control Panel https://github.com/aws/amazon-connect-streams/blob/master/Documentation.md#connectcoreinitccp
connect.core.initCCP(ccpDiv, {
  ccpUrl: ccpUrl,
  loginPopup: true,
  softphone: {
    allowFramedSoftphone: true
  }
});


//Subscribe a method to be called on each incoming contact
connect.contact(eventListener); //https://github.com/aws/amazon-connect-streams/blob/master/Documentation.md#connectcontact

//The function to call on each incoming contact
function eventListener(contact) {
  window.contactControlPanel.contact = contact;
  updateAttributeElement(contact.getAttributes()); //https://github.com/aws/amazon-connect-streams/blob/master/Documentation.md#contactgetattributes
  contact.onEnded(clearAttributeElement); //https://github.com/aws/amazon-connect-streams/blob/master/Documentation.md#contactonended
}

//Loops through attributes object and prints out the corresponding key:value
function updateAttributeElement(msg){
  for (var key in msg) {
    if (msg.hasOwnProperty(key)) {
      var connectAttributesDiv = document.getElementById("connectAttributesDiv");
      var newAttribute = document.createElement('div');
      newAttribute.innerHTML = '<strong>' + key + '</strong>: ' + msg[key]['value'] + '<br />';

      while (newAttribute.firstChild) {
        connectAttributesDiv.appendChild(newAttribute.firstChild);
      }
    }
  }
}

//Clears the previous contact attrbitues onEnded (disconnect) of contact
function clearAttributeElement(){
  document.getElementById("connectAttributesDiv").innerHTML = "";

}
</script>
</body>

</html>
The end result is a “Call Me” framework that can be used to capture pass session attributes through to the contact experience:
Over the past two years, I’ve had a few iterations on my home dashboard project. All of the integrations for a “smart home” have been rather dumb in the sense that they’re just handling static transactions or act only as a new channel for taking actions. I wanted to change this and start bringing actual intelligence into my “smart” devices.
A major problem in the current smart device landscape is the amount of proprietary software and devices that are suffocating innovation and stifling the convenience and luxury that a truly “smart home” can bring to consumers/homes of the future — this means improving my standard of living without effort, not just being a novelty device (a “smart” lightbulb that can be controlled through another novelty device like Amazon Alexa).
In this vein, I’ve been connecting my devices (not just my smart devices) into a single product that enables devices to interact with each other without my intervention. This project has slowly morphed from a UI that simply displayed information and allowed on/off toggling to an actual dashboard that will take actions automatically. There’s not much special behind many of these actions at the moment but it’s a starting point.
Home UI: Version 3
In the prior two iterations of my Home UI product, I focused on two static aspects: device functionality and data collection. With V3, I’ve shifted focus to merging those two and bringing in proactive, intelligent actions and notifications.
Key features
Building Habits and Accomplishing More: Using my calendar, weather forecast, my entertainment preferences, and my to-do lists, the system will make scheduling suggestions to help me build positive habits or remind me to take take care of household tasks in a more timely manner. For example, the system knows that I enjoy going to the movies but also knows I enjoy doing things outdoors. The system will encourage an outdoor task if the weather is nice and suggest a movie when it’s raining/I have nothing else scheduled. Similarly, the system will suggest items from my to-do list based on their due date and priority.
Commute Planning: the system collects real-time traffic information from Google Maps; toll, traffic alerts (crashes, special events, construction, etc), and camera feeds from WashDOT; and road condition information, including subsurface temperatures from WashDOT, to compare against my calendar for the day and recommend a time for travelling to/from work. For example, if there’s a SeaHawks game in the evening, the system will recognize that and recommend an earlier or later departure to avoid sitting in traffic. Similarly, if I have an early meeting, the system will send me a push notification the night before to recommend setting an earlier alarm.
Device Event Bundling: a common use case in home automation, the system will take multiple actions across multiple devices based on a single trigger. For example: before leaving the house, I’m able to reduce my thermostat, turn off all lights, and set my security alarm with having to take each of those actions individually. This isn’t a new concept but it’s a nice implementation despite the various product types supported.
Neighborhood Awareness: police events around my home are pushed to me so I know when there was a burglary, car theft, or other concerning event near me. Others are stored and available in a map view.
Full List of Features
Pipes RTSP feeds from security cameras and save them to AWS S3 (30 days of storage for ~$1.50)
Detect motion in video feeds and triggers notifications
Push notifications for:
Motion detection from security cameras
Police events near my house
Traffic alerts that can impact my commute
To-Do list reminders and calendar reminders
SimpliSafe Security System integration
Nest thermostat API integration
Nest Hello doorbell camera integration
Police events, restaurant health inspection scores, building permit applications, and traffic information for my community are captured/plotted
YeeLight integration/control
Google Calendar integration
Stock price integration (for stock in my portfolio)
Amazon Echo Music integration (history only)
And a few other things I’ve shared before (such as my movie collection UI)
Hardware in Use
Nest thermostat
Nest Hello
Hikvision security cameras
SimpliSafe Alarm System
YeeLight light bulbs (I highly recommend these)
Raspberry Pi (handles some LAN things)
Software Used
The primary UI and backend database runs on AWS Lightsail
The foundation of the system has three core components: 1) building and flattening a timeline for my persona so it knows what to recommend/do and when to recommend/do it, 2) data collection and transformation from a number of different sources, and 3) API/event handling for the devices I use (cell phone, Nest, security stuff, etc).
In order for the system to be most effective, it needs to know a bit about me – it needs data for intelligence. To enable this, I’ve integrated a ton of my day-to-day apps (calendar, note app, commute times, data from my android phone, etc.) so that it’s aware of what I need/want/plan to do. Using this, I can build a sufficient schedule on-the-fly and the system can accompany me by bringing relevant meta-data along the way.
When the persona and supplemental data are merged, higher-quality and intelligent recommendation are the result.
1984
The downside to this approach is the obvious self-inflicted 1984 “big-brother” effect. I’m putting a lot of meta-data about my routine and my lifestyle into the system to effort to encourage the system to reduce the number of small decisions I’m burdened with day-to-day. It sounds crazy just writing that out…I know this.
I see this as inevitable, though. In order for us to achieve the next level of immediacy and convenience, we’ll have to get used to the idea that the next generation of smart devices (ie the next generation of Google AI, Alexa, Siri, etc) will begin using more of the information they already know about us to improve the quality and effectiveness of the convenience we told ourselves we’d get when we purchased the current generation of these devices. Accepting this, I’m okay with sharing a small amount of additional detail alongside what I already share today into a system I control end-to-end.
What’s Next?
I’m working towards extension of the personas concept through deeper integration. I want to focus on making the outputs surfaced to me higher value (ie more intelligent alerting and suggesting) while also concerning myself with less information.
In parallel, I want to continue shifting the system from primarily smart home to an intelligent assistance and entertainment console. I also see this evolving into hardware integrated into the house.
I’ve read many different guides on this but none seemed to provide end-to-end guidance or were cluttered with other noise unrelated to Lambda or Connect.
The power of Lambda function inclusion in the contact flow is immense – perform security functions, lookup/validate/store data, lookup customer data for CRM integration, etc. While learning this, I created a simple Lambda function to simply multiply the caller’s input by 10, store both numbers, and return the output to the caller – I’ll dive into querying Dynamo databases in the near future.
What we’re doing
Using Amazon Connect and AWS Lambda, we’ll create a phone number which accepts a user’s DTMF input, multiplies it by 10, saves the results as contact attributes, and regurgitates those numbers to the caller. The final experience can be had by calling +1 571-327-3066 (select option 2).
Step 1-Create your Lambda Function
Visit the Lambda console and select “Create Function”. For this example, I’m going to use the following details:
Name: “FKLambdaDataDip”
Runtime: Node.js 8.10
Rule: Create a custom role (and use the default values on the subsequent popup)
Step 2-Creating the Resource Policy
Now that the Lambda function exists, copy the ARN from the top right of the page:
Using the AWS CLI, we’ll create a resource policy for the function & Connect:
Step 3-Granting Connect permission to invoke your Lambda function
From the Connect admin page, select “Contact Flows” from the left menu. Under the AWS Lambda heading, select your function from the drop down and click ‘+Add Lambda Function”.
You should now be able to successfully invoke your Lambda function via your Amazon Connect contact flow.
Step 4-Creating the Amazon Connect Contact Flow
I’m going to outline my high-level flow before finishing my actual Lambda function. We’ll come back and plug in all the variable names and details. Here’s the visual of my flow:
Step 5-Finalizing the AWS Lambda Function
As noted, our function will simply multiple the number entered by 10 and return it.
exports.handler = function(event, context, callback) {

var receivedCallerSubmittedNumber = event['Details']['Parameters']['callerSubmittedNumber'];
var calculated = receivedCallerSubmittedNumber * 10;

var resultMap = {
    sentLambdaCalculatedNumber:calculated
}

callback(null, resultMap);
}
Note that we’re getting to the “callerSubmittedNumber” variable via “event[‘Details’][‘Parameters’][‘callerSubmittedNumber’]”. This is because the json published from Connect to Lambda has this structure (where our Connect attributes are passed in the parameters section):
Back in the Contact Flow Designer, we’ll edit the “Invoke AWS Lambda Function” module to plug in our Function ARN (again, copied from the Lambda function’s page). This is the same function ARN that you setup the policy for in step 2.
In the next “Set contact attributes” module, we’ll set the attribute “Destination Key” to “lambdaCalculatedNumber”, the type to “External”, and the “Attribute” to “sentLambdaCalculatedNumber”.
Lastly, we’ll edit the last prompt of the flow to play back the number by configuring it to “Text to speech”, “Enter Dynamically”, “External” as the type, and “sentLambdaCalculatedNumber” as the Attribute.
Save and publish your contact flow.
As the variable and key assignments can be a bit confusing and as the documentation provided by Connect on this is of poor quality, I’ve recorded what I’ve set each of my to in this demo. Connect’s own documentation actually has some typos in it that will result in errors from Lambda (at the time of writing this, at least).
Step 7-Testing
Once you associate your contact flow with a number, you can now test. Beyond dialing and hearing the response, we can see it recorded alongside the contact attributes:
I’ve setup a test number for this demo: +1 571-327-3066 (select option 2). Dial to experience the end result.
Amazon Connect is the AWS answer to costly contact center telephony platforms. There’s no upfront costs and overall usage is EXTREMELY cheap when compared to legacy telephony platforms – you essentially just pay per minute.
I wanted to play with this a bit so I setup an instance and created a simple script to place outbound calls which will allow the call recipient to choose from hearing Abbott and Costello’s famous “Who’s on first?” bit or running their call through a sample Lambda script to identify their state (call 1-571-327-3066 for a demo, minus the outbound experience). Real-world use cases for this could automating calls to remind customers of upcoming appointments, notifying a group of an emergency situation, creating a “Don’t call us, we’ll call you!” customer service setup (so that you don’t have to expose your company’s phone number), scheduling wake-up calls, etc.
What we’re doing
Using Amazon Connect, we’ll:
Configure our instance for application integration
Create a sample contact flow with basic IVR and Lambda integration
Use the Connect API to place a phone call (with PHP)
This assumes you already have your Amazon Connect instance setup with a single number claimed. If not, this takes ~5 minutes to do.
Step 1: Configure your instance for application integration
In order to interact with Connect outside of the Connect console, you have to add an approved origin. From the AWS console, select “Application Integration” and add the domain which will house our script (from step three below).
Step 2: Create the contact flow
As noted above, my example will call the user and give them an option to listen to “Who’s on First?” or interact with a Lambda function (which will detect state based on area code). You could easily use a pre-defined contact flow for this or create your own. Here’s the contact flow I’m using:
Step 3: Use the Connect API to place an outbound call
Like all other API interactions, you’ll need credentials. To do this, I create a temporary IAM user that has the AmazonConnectFullAccess policy attached.
The next thing you’ll need to do is get your instance ID, contact flow ID, and queue ID. Connect could make this a bit easier but it’s still simple to locate.
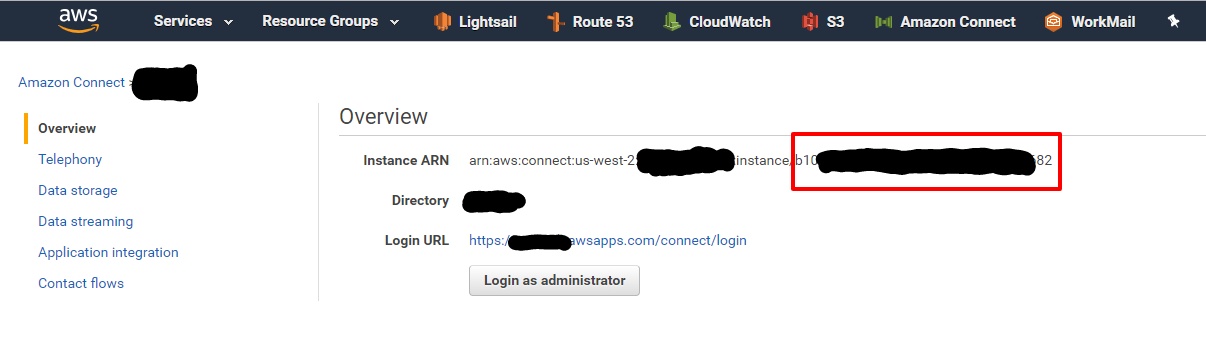
Getting your instance ID: Navigate to the Connect page in the AWS console and on the “Overview” page, you’ll see your instance ARN. It’s formatted similar to “arn:aws:connect:us-west-2:99999999instance/”. Your instance ID is after the “…instance/” portion. This is also in the queue and contact flow ARNs.
Getting your contact flow and queue IDs: From the Connect console, navigate to the contact flow and queue ID you want to use. On both pages, you’ll see “Show additional queue information”. On click, this will display the ARN. The tail (after “…/queue/” or “…/contact-flow/” of the ARNs contain your IDs. These both also contain your instance ID.
The script itself is pretty straight-forward. I’ve set it up so that each of the numbers to dial are loaded into an array and from there, it just loops through each and places the call:
<?php
//Include AWS SDK
require '/home/bitnami/vendor/autoload.php';

//New Connect client
$client = new Aws\Connect\ConnectClient([
'region'  => 'us-west-2', //the region of your Connect instance
'version' => 'latest',
'credentials' => [
  'key' => '<yourIAMkey>', //IAM user key
  'secret' => '<yourIAMsecret>', //IAM user secret
]
]);

$dialNumbers=array('<phonenumber1>','<phonenumber2>');
foreach ($dialNumbers as $number){
  $result = $client->startOutboundVoiceContact([
    'ContactFlowId' => '<contactFlowId>', // REQUIRED
    'DestinationPhoneNumber' => "$number", // REQUIRED
    'InstanceId' => '<yourConnectInstanceId>', // REQUIRED
    'QueueId' => '<yourConnectQueueId>', // Use either QueueId OR SourcePhoneNumber. SourcePhoneNumber must be claimed in your Connect instnace.
    //'SourcePhoneNumber' => '', // Use either QueueId OR SourcePhoneNumber. SourcePhoneNumber must be claimed in your Connect instnace.
  ]);

  echo "<pre>";
  print_r($result);
  echo "</pre>";
  echo "<hr />";
}
?>
The phone numbers must be formatted in E.164 format. The US, for example, would be +15555555555.
I wanted to stream and record my home security cameras to the cloud for three reasons: 1) if the NVR is stolen, I’ll have the footage stored remotely, 2) (more realistically) I want to increase the storage availability without having to add hard drives, and 3) I want to increase the ease-of-access for my recordings. There are a number of services that do this for you (such as Wowza) and you can also purchase systems that do this out-of-the-box. The downside to services like Wowza is cost — at least $50/month for a single channel streaming without any recording – and the out-of-the-box solutions are expensive and run on proprietary platforms that limit your use and access…plus it’s more fun to do it yourself and learn something.
The solution I arrived at was to use AWS Lightsail and S3. This gives me the low cost, ease of scale, and accessibility I desire. Due primarily to the transfer rate limits, Lightsail will only work for small, home setups but you could “upgrade” from Lightsail to EC2 to mitigate that. After all, Lightsail is just a pretty UI that takes away all the manual config work needed to setup an EC2 instance (in fact, Lightsail utilizes EC2 behind the scenes). If you prefer not to use Lightsail or EC2 at all, you could swap in a Raspberry Pi to do the grunt work locally and pass the files to S3. This would cut the monthly cost by ~$5 but comes with the maintenance of local hardware.
What we’re doing
In this guide, we’ll capture and RTSP stream from a Hikvision (which includes most Nightowl, LaView, and many more as they all use a branded form of Hikvision’s software) security camera NVR and save the files to AWS S3 by:
I’m going to use the $5/month LAMP w/PHP7 type so that we can have the 2TB of transfer. In my testing, this was sufficient for the number of cameras/channels I’m handling. You should do your own testing to determine whether this is right for you. Keep in mind that transfer is measured both in AND out and we’ll be transferring these files out to S3.
Navigate to Lightsail
Select [Create Instance].
Here’s a screenshot of the instance I’m using:
Although 100% optional, I’d recommend going ahead and assigning a static IP and setting up a connection in PuTTY. Otherwise, the web terminal window provided in the Lightsail UI will work – I find it a bit buggy, though.
Step 2: Install LiveMedia-Utils package
The LiveMedia-Utils package contains openRTSP which is the key to consuming and storing the feeds from our NVR. Once connected to our Lightsail instance, let’s:
sudo apt-get install livemedia-utils
cd /usr/src
sudo wget http://www.live555.com/liveMedia/public/live555-latest.tar.gz
sudo tar -xzf live555-latest.tar.gz
cd live
sudo ./genMakefiles linux
sudo make
sudo make install
At this point, openRTSP should be ready to go.
Step 3: Capturing the RTSP steam
I want to keep my video files contained so let’s create a new directory for them:
mkdir /home/bitnami/recordings
cd /home/bitnami/recordings
And now we’re ready to test! I’d recommend reviewing the list of options openRTSP offers before diving in. Here’s my set of options:
Some explanations:
-D 5 | Quit if nothing is received for 5 of more seconds
-c | Play continuously, even after –d timeframe
-B 10000000 | Input buffer of 10MB.
-b 10000000 | Output buffer of 10MB (to the .mp4 file)
-4 | Write in .mp4 format
-Q | Display QOS statistics on exit
-F CAM1 | Prefix the .mp4 files with “CAM1”
-d 300 | Run openRTSP for this many seconds – essentially, the length of your files.
-P 300 | Start a new file every 300 seconds – essential, the length of your individual files (so each 5 minute block of time will be a unique file)
-t | Use TCP instead of UDP
-u <> | My cam’s username, password, and the RTSP URL.
You can use tmux to let openRTSP command contiue to run in the backgound (otherwise, it’ll die when your close your terminal window). So:
Now that the SDK is installed, we can create a simple script and cron to filter through the files in the /home/bitnami/recordings directory, determine their age, move the oldest S3, and delete the file from Lightsail. If my files are 5 minutes long, I’ll have my cron run every 5 minutes. Yes, there are more efficient ways of doing this but I’m okay with being scrappy in this situation.
I’d recommend taking a snapshot of your instance now that everything is setup, tested, and finalized. This enables you to tinker and try new things without worrying about having to repeat this process if you screw something up.
I’ll create a directory for my cron script and its log to live and then create my cron file:
mkdir /home/bitnami/cron
cd /home/bitnami/cron
sudo nano move.php
Here’s the script (move.php) I wrote to handle the directory list, sortation, movement to S3, and deletion from Lilghtsail:
<?php
//Include AWS SDK
require '/home/bitnami/vendor/autoload.php';

//Start S3 client
$s3 = new Aws\S3\S3Client([
'region'  => 'us-west-2',
'version' => 'latest',
'credentials' => [
  'key' => '<iamkey>', //IAM user key
  'secret' => '<iamsecret>', //IAM user secret
]
]);

//Set timezone and get current time
date_default_timezone_set('America/Los_Angeles');
$currentTime=strtotime("now");

 //Get a list of all the items in the directory, ignoring those we don't want to mess with
$files = array_diff(scandir("/home/bitnami/recordings",1), array('.', '..','.mp4','_cron_camsstorevideos.sh'));

//Loop through those files
foreach($files as $file){
  $lastModified=date ("Y-m-d H:i:s", filemtime("/home/bitnami/recordings/$file"));//Separate out the "pretty" timestamp as we'll use it to rename our files.
  $lastModifiedEpoch=strtotime($lastModified);//Get the last modified time
  if($currentTime-$lastModifiedEpoch>30){ //If the difference between now and when the file was last modified is > 30 seconds (meaning it's finished writing to disk), take actions
    echo "\r\n Taking action! $file was last modified: " . date ("F d Y H:i:s", filemtime("/home/bitnami/recordings/$file"));
    //Save to S3
    $result = $s3->putObject([
    'Bucket' => '<bucketname>', //the S3 bucket name you're using
    'Key'    => "CAM1VIDEO @ $lastModified.mp4", //The new filename/S3 key for our video (we'll use the last modified time for this)
    'SourceFile' => "/home/bitnami/recordings/$file", //The source file for our video
    'StorageClass' => 'ONEZONE_IA' //I'm using one zone, infrequent access (IA) storage for this because it's cheaper
    ]);

    //Delete file from lightsail
    unlink("/home/bitnami/recordings/$file");
  }
}
?>
That’s it! As long as you have the write policy applied to your bucket, you should be good to go:
The last thing I’ll do is set a crontab to run the move.php script every 5 minutes and log the output:
With AWS Rekognition launching since then, I figured I’d try it out and see how it compares. I used a fake receipt to see how it’d do.
Like every other AWS product I’ve used, it was incredibly easy to work it. I’ll share the simple script I used at the bottom of this post but, needless to say, there’s not much to it.
Somewhat more disappointing was the limited range of confidence scores Rekognition returned (for each text detection, it provides a confidence score). The overall output was pretty accurate but not accurate enough for me to consider it “wow” worthy. Despite this, all of the confidence scores were above 93%.
To be considered an OCR service, AWS Rekognition has a long way to go before it’s competitive as an OCR service. It’s performance in object detection/facial recognition (which is the heart and primary usecase of Rekognition) may be better but I haven’t tested that at this point.


 A few months ago I tried using


